
Search

Can't find what you're looking for? Try Google Search!

Showing posts with label Baking. Show all posts
Showing posts with label Baking. Show all posts
 Japanese Sweet Bread - Melon Pan (メロンパン)

 Monday, January 30, 2012 |
  Posted by
Admin
Posted by
Admin
Melon Pan (メロンパン) is a sweet bread from Japan. The bun is covered with a thin layer of sweet cookie dough and given beautiful diamond patterns which resembles that of a rock melon. But its not as the name says. They are not traditionally melon flavored. But these days, people have started adding melon or melon extract to the bread to add its flavor. What's more addicting is the top cookie dough which gives the entire bun a special taste.
The preparations are done in two parts. One is about preparing the cookie dough and next is the bread dough. Its a bit long process, so make sure you have got enough time on hand. Also be patient and I'm sure you'll be successful. Do not give up at any point.

- If you don't have the mentioned flour, you may substitute it with all purpose flour. But you might find a slight difference in the texture.
- In case you don't have the non-fat dry milk powder, you can add the full fat one.
- It's always best to use unsalted butter as the salt in it can overpower the sweet flavor of the butter. For best results, bring the butter to room temperature (keep the butter out of the refrigerator for at least 1 hour prior to the preparation or until it gets soft).
- Just like butter, bring the egg to room temperature before use.
- The fermentation time depends on its temperature. It ferments well in a humid environment, so be careful about it. Fermentation can also be done in a different way by keeping the dough bowl in another bowl of hot water.
- Melon pan tastes more delicious when freshly baked than while its completely cooled.
- Bread Dough
140g bread flour
25g sugar
1/3 teaspoon salt
5g non-fat dry milk powder
3g instant yeast
70ml warm water
1 tablespoon beaten egg, room temperature
15g unsalted butter, room temperature
bread flour for dusting
- Cookie Dough
25g unsalted butter, room temperature
35g sugar
25g beaten egg, room temperature
80g cake flour
1/4 teaspoon baking powder
Bread flour for dusting
Method:
- Preparing the Cookie Dough
1. Cream the butter in a bowl.
2. Gradually add the sugar in two separate additions and continue to beat until the color turns white.
3. Now add the egg in four separate additions to the butter mixture and mix until it's completely combined. Do not add the egg all at once. If you do, the batter will separate.
4. In a separate bowl, mix the flour, baking powder and sift into another bowl.
5. Add the flour to the butter mixture in three separate additions and mix thoroughly until fully incorporated. Be light with this and be careful not to over mix the dough.
6. Transfer the dough onto a plastic wrap. Neatly form it into a cylindrical shape. Cover and chill in the fridge for about 1 hour.
While it's resting, let's prepare the bread dough.
- Preparing the Bread Dough
1. In a medium bowl, add the flour, sugar, salt, milk powder, yeast and mix well.
2. Add warm water to the beaten egg and whisk. Pour into the flour and mix evenly with a spatula.
3. Transfer the mixture to a pastry board. Knead until the dough is no longer sticky.
4. Flatten the dough and spread the butter. Pull the sides of the dough to the center and continue kneading. It will be very oily, but don't worry. The dough will absorb the butter soon. Continue to knead for about 15 minutes until a soft dough is formed.
5. Shape into a ball and place it back to the bowl. Cover with a plastic wrap and let it sit in a warm place for about 40 minutes or until double in size.
6. After the fermentation, remove the plastic wrap. Dip your index finger in the flour and make a hole in the center of the dough. If the hole quickly disappears, the dough need more fermentation.
7. Dust flour on the pastry board. Place the dough onto the board and flatten it to remove the gas. Roll the dough into a long cylinder.
8. Divide the dough into five equal pieces.
9. Roll them into neat balls. Place them on a cooking tray dusted with flour. Cover with a plastic wrap and let it rest for 20 minutes at room temperature.
Meanwhile, let's work with the cookie dough.
- Working with the Cookie Dough
1. Divide the cookie dough into five equal pieces.
2. Put a little flour on your hands and begin shaping each pieces into a ball.
3. Place the dough on a plastic wrap. Place another wrap on it. Press the dough with a pastry scraper until it reaches 3 1/2 inch diameter. To make this easy, draw the circle on a paper and place it below the wrap. This will help you get it right.
4. Place the cookie sheets on the cooking tray dusted with flour. Cover with a plastic wrap and leave it in the fridge while the bread dough is resting. This makes the cookie dough easier to handle.
Now let's shape the melon pan.
- Shaping the Melon pan
1. Re-shape the bread dough once again into a ball.
2. Take a cookie sheet and cover the bread dough. Don't cover the whole dough. Leave the bottom side open.
3. Turn the dough upside down and adjust the cookie sheet. Pinch the bottom of the bread dough and dip the cookie dough.
4. Hold the melon pan on your palm and draw diamond patterns on the top using scraper.
5. Place the buns on a baking tray and let it sit in a warm place for second fermentation for about 40 minutes or until double in size.
- Baking the Melon Pan
1. Preheat the oven to 340°F.
2. Bake the melon pan until the top is slightly browned.
Kakkoii Deshou (かっこいい でしょう) ! You have baked delicious melon pan. Now cool it on a cooling rack and they are ready to be served.
We were excited as we got it right with our first try. It came out beautifully and also tasted so delicious. So I'm sure you can also do it.
Good luck with the preparation!


Vanilla Sponge Cake
Monday, January 23, 2012 |
Posted by
Admin
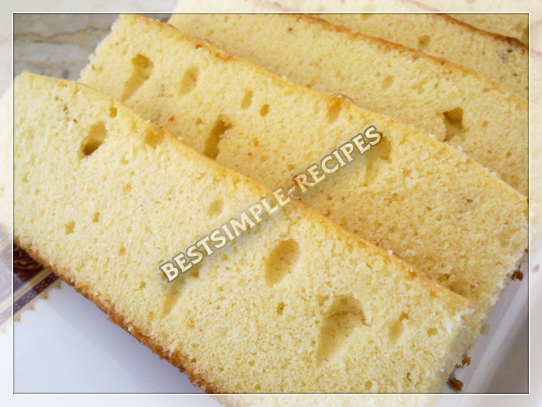
Have you ever tried baking a cake yourself? Might be a bit nervous at first, right? Don't worry, it's not as tough as you think. Of course, only hard work can give you perfect result. But once prepared, you can have a cake just like how you get it from the bakery. Or may be better than that? Let's give it a try. Perfect your way to making this sponge cake and I'm sure you'll be able to make other type of cakes too.
Sponge cake is the most simple cake that anyone can bake. A perfect sponge cake = light + fluffy + airy texture. One main aspect of a good sponge cake is the quality of ingredients. Baking is science, so its important to measure them accurately. Beating the batter means, incorporating air bubbles which helps to make the cake light. Air bubbles is the secret to a fluffy cake. Now before you start preparing the batter, make sure to read the following tips which will help you bake a successful cake.
Tips:
- It's always best to use unsalted butter as the salt in it can overpower the sweet flavor of the butter. For best results, bring the butter to room temperature (keep the butter out of the refrigerator for at least 1 hour prior to the preparation or until it gets soft).
- Quality of the egg is really important. So choose free-range eggs if possible. Just like butter, bring the eggs to room temperature before use.
- Go light with the batter, so that you don't break the air bubbles. If you let the air bubbles remain, your cakes will rise better.
- Make sure the oven is at the right temperature.
- Never open the oven door in the midst of baking as the temperature of the oven will get disturbed when the cold air enters. This action can affect the rising of the cake.
- If you love chilled cake, then this tip is for you. Never place the baked cake right from the oven to the fridge. If you do so, the top will be sticky. Let it cool completely in room temperature and then place it covered in the fridge.
2 1/2 cups flour
1 tablespoon baking powder
1 cup unsalted butter, room temperature + more for greasing the pan
2 teaspoons vanilla extract
1 1/2 cups granulated white sugar
4 eggs, room temperature
3/4 cup milk
Method:
1. Preheat oven to 338°F.
2. Brush the baking pan with melted butter and lightly dust with flour. Keep it aside.
3. Mix the flour and baking powder in a medium bowl and sift them thrice. We're doing this to aerate it and to avoid any lumps in the batter. Doing so will help to create a light sponge cake. Set aside.
4. In a large bowl, beat the butter using electric mixer on high speed until softened.
5. Add vanilla extract, sugar and continue beating until light and fluffy. Using a rubber spatula, scrape down the sides of the bowl frequently.
6. Beat in eggs 1 at a time. If you add all at once, the batter will separate and this can result in a heavy cake.
Next, we're going to add the flour and milk together in 2 separate additions.
7. Add half of the flour and half milk. Beat on medium speed just until combined. Just like earlier, make sure to scrape down the sides of the bowl.
8. Alternatively, add in the rest of the flour and milk and beat until fully incorporated.
Now shall we check if the batter is ready? Try to scoop up the batter using the spatula. Does it drop nicely like a ribbon?
If yes, the batter is perfect for baking.
If not, then you need to beat the batter a little more.
9. When the batter is done, pour into the greased pan.
10. Bake it for about 35 to 40 minutes or until golden brown.
Now do you know how to check if the cake is done for sure? Insert a skewer or toothpick to the center of the cake. Does it come out clean?
If yes, your cake is done.
If not, then you need to bake it for more time.
If properly cooked, you can also find that the cake has started leaving the sides of the pan.
11. Remove the cake from the oven and cool it.
Congratulations! Finally, you have baked a perfect sponge cake yourself. Just like I said, wasn't it an easy job?
Good Luck!
Butter Cookies
Friday, January 06, 2012 |
Posted by
Admin
This cookies is so delicious with buttery flavor that melts in your mouth. It's so easy to make that you don't even need to chill the dough before baking. As soon as the dough is prepared, you can begin shaping and put into the oven. I'm sure you'll love it.
But I've added a few tips that's important to read before baking. Please read them a few times to bring successful result.

Tips:
1 cup unsalted butter, room temperature
1/2 cup powdered sugar
2 cups all purpose flour
1 teaspoon baking powder
1 egg, room temperature
2 teaspoons vanilla extract
Method:
1. Preheat the oven to 350°F.
2. In a medium bowl, beat the butter until pale in color.
3. Add the sugar and keep on beating.
4. In a separate bowl, mix the flour, baking powder and add to the butter mixture. Beat just until combined.
5. In another bowl, beat egg and vanilla extract together until it double in size.
6. Now add the beaten egg to the previous mixture. Using a rubber spatula, mix well until a soft dough is formed.
7. Pipe cookies of your favorite shape to the baking tray using a pastry bag.
8. Bake just until the edges starts browning.
Good luck with the cooking!
- It's always best to use unsalted butter as the salt in it can overpower the sweet flavor of the butter. For best results, bring the butter to room temperature (keep the butter out of the refrigerator for at least 1 hour prior to the preparation or until it gets soft).
- If you don't have powdered sugar, you can prepare it yourself by powdering granulated sugar in a blender until it is grounded in to a very fine powder. Never add the sugar to the recipe as soon as it is powdered. As it will be slightly hot and that can mess up your preparation. So let it sit for at least 5-10 minutes before use.
- Just like butter, bring the egg to room temperature before use.
- Freshly baked cookies can be a bit fragile. So it's highly recommended to let them cool completely before you serve.
- Store cookies in an air tight container. But it's important to let the freshly baked ones loose their moisture completely before storing. Else, the cookies will get soft and crumble. To avoid this, let it cool for a couple of hours before storing.
1 cup unsalted butter, room temperature
1/2 cup powdered sugar
2 cups all purpose flour
1 teaspoon baking powder
1 egg, room temperature
2 teaspoons vanilla extract
Method:
1. Preheat the oven to 350°F.
2. In a medium bowl, beat the butter until pale in color.
3. Add the sugar and keep on beating.
4. In a separate bowl, mix the flour, baking powder and add to the butter mixture. Beat just until combined.
5. In another bowl, beat egg and vanilla extract together until it double in size.
6. Now add the beaten egg to the previous mixture. Using a rubber spatula, mix well until a soft dough is formed.
7. Pipe cookies of your favorite shape to the baking tray using a pastry bag.
8. Bake just until the edges starts browning.
Good luck with the cooking!

Subscribe
 Get the latest updates delivered to your inbox for free. We respect your privacy.
